Recommended Age: 4 and ½ to 6 years
Level of Parent Involvement: Medium, the adult must prepare the materials and facilitate the initial exercise with the child, once the child has been shown they may repeat the exercise independently
Prerequisites
- The child must be able to stay focused on a task
- The child must be able to participate in an exercise which involves a sequence of steps
- The child must be able to cut reasonably accurately
Materials
- A phone with a camera OR a digital camera (Big W have wonderful children’s digital cameras for $99)
- A printer
- A small mirror
- Scissors
- Post it notes or 3 small pieces of paper
- Writing pencil
- Small basket or tray to place the images when finished
Preparation
- Prior to completing the exercise with the child, conduct a lesson about Symmetry;
Discussion points:
- Rotational symmetry: where an image can be rotated on a central point and still looks the same
- Reflection symmetry: where one half is a reflection of the other half
- Non-symmetric (asymmetric): the object does not have equal parts (both sides are different)
Use examples to illustrate the concept of symmetry using objects or pictures from the child’s environment and the mirror
Steps
- Once you have conducted the lesson about symmetry with the child, invite the child to go on a walk outside
- Allow the child to independently prepare for the weather conditions (hat, sunscreen, jacket, beanie, shoes etc)
- Let the child know that they will be taking photos of objects in nature for this exercise
- Show the child the camera or phone that they will be using and demonstrate how to take a picture
- Go for a walk outside with the child, taking pictures of various items in nature (leaves, sticks, tree stumps, pinecones, flowers, rocks etc)
- With each picture taken, make guesses as to whether the object is symmetrical and why
- Once you and the child have taken enough pictures (12-18 is ideal), go back inside or walk home
- When you arrive home, explain to the child that you will be printing the pictures taken from the walk
- Involve the child in this process, letting them help take the paper out of the printer as they come
- Once the images are printed the child may cut out the photos, helping the child if necessary
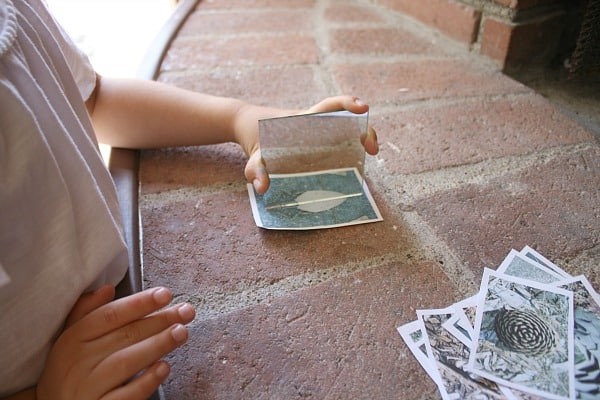
- Once the photos have been cut out, make a pile with the images and go to the child’s table, take the mirror
- One at a time show the child how to test if the image is symmetrical using the mirror (see below image)
- Encourage the child to find the line of symmetry and to explore the different ways they can make each image looks in the mirror
- Once the child has finished exploring the images with the mirror invite the child to sort the images into 3 different categories
- On a small piece of paper or post it not write labels for the categories (rotational symmetry, not symmetrical, reflection symmetry)
- Invite the child to test each image with the mirror and place the image under the label of its respective category (see below image)
- When the child is finished they may place the images and labels in the basket or tray for future work
Variations
- The child may make symmetrical pictures using items found in nature
Books about symmetry
- Is it symmetrical by Nancy Allen
- What is symmetry in nature? By Bobby Kalman
- Seeing symmetry by Loreen Leedy


